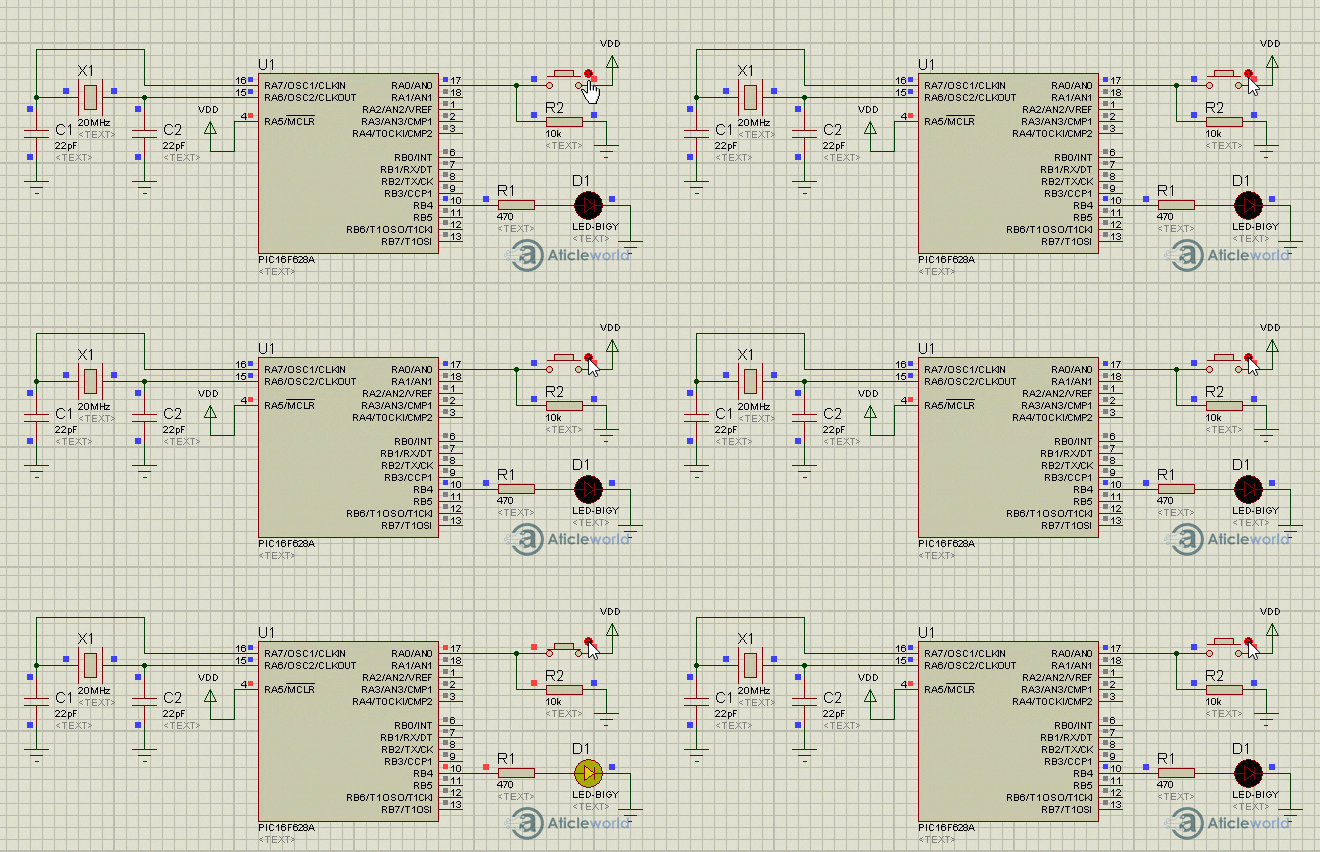
In the article, we will learn push button interfacing with PIC Microcontroller. Like another Microcontroller PIC also provide the GPIO (General Purpose input-output) pins. We can interface input-output devices (Led, Switch, Adc, Sensors, ..etc) to GPIO pins.
Here we learn how to control a led using an SPST (single pole single throw) switch. An Led and Push-button is the basic example of input and output device, before moving toward the interfacing of led and Push-button interfacing with PIC microcontroller. I want to introduce you guys to the Led and switch ( Push-button).
Push-button:
The Push-button is a basic input device in the embedded system. It is used to control the operation of any output device using the microcontroller or control unit. It basically breaks the electrical circuit and interrupts the flow of current.

The push-button is basic mechanical on-off buttons that act as control devices. It short circuits the line when it is pressed and opens when it is not pressed.
Connection of push-button:
In-circuit Pull-up and Pull-down resistor use to convert infinite or zero resistance into the digital signal. On the basis of the pull-up and pull-down resistor, we can interface the switch in two-way, but the most important point need to remember that the value of pull-up and pull-down resistor depends on the microcontroller.
Positive Logic: In this connection, we use a pull-down resistor connected to the ground. When we pressed the switch then logic asserts high and when we disconnect the switch logic assert low.

Negative Logic: In this connection, we use a pull-up resistor connected to Vcc. When we pressed the switch then logic asserts low and when we disconnect the switch logic assert high.

Note: We faced the problem with the mechanical switch when we pressed the switch then it oscillates. It’s called bouncing of the switch, its varies according to the switch. We can resolve the bouncing problem with the help of hardware or software. In software, If we give the delay of a few milliseconds between the time, when we read the status of the switch then we resolved the switch bouncing problem.
Algorithm to control the led using the switch (SPST):
- The microcontroller pin connected to the led makes the output.
- The microcontroller pin connected to the switch makes the input.
- Continuous monitor the status of the switch, if the switch is pressed then led pin status high either make it low.
So finally let see the C program to control an LED using the push button. I have used MPLAB v8.85 with the HI-TECH C v9.83 compiler to creating this project “Push button interfacing with PIC Microcontroller”
/* Name     : main.c
*  Purpose  : Main file for interfacing switch and led with PIC16F628A.
*  Author   : Amlendra Kumar
*  Website  : https://aticleworld.com
*/
#include<htc.h>

// Configuration word for PIC16F877A
__CONFIG( FOSC_HS & WDTE_OFF & PWRTE_ON & CP_OFF & BOREN_ON
          & LVP_OFF & CPD_OFF & WRT_OFF & DEBUG_OFF);


// Define CPU Frequency
// This must be defined, if __delay_ms() or
// __delay_us() functions are used in the code
#define _XTAL_FREQ   20000000


//Value of Delay
#define DEBOUNCE_VALUE  240

//Switch Status
#define SWITCH_PRESSED    1
#define SWITCH_BOUNCE     0

//LED STATUS
#define LED_ON           1
#define LED_OFF          0


// Define pins
#define LED		RB4
#define SWITCH  RA0


//Function to check the status of Switch
int isSwitchPressed(void)
{
    int switchStatus =  SWITCH_BOUNCE;
    if(SWITCH == SWITCH_PRESSED)
    {
        __delay_us(DEBOUNCE_VALUE); //Wait time more then bouncing period
        if(SWITCH == SWITCH_PRESSED)
        {
            switchStatus = SWITCH_PRESSED;
        }
    }
    return switchStatus ;
}


//Program start from here
int main(void)
{
    TRISA0 = 1;	// Make this pin an input
    TRISB4 = 0;	// Make LED pin an output
    LED = 0;// Turn LED off
    //Super loop to continuously monitor the status of the switch
    while(1)
    {
        //Check the switch status
        if(SWITCH_PRESSED == isSwitchPressed())
        {
            LED = LED_ON;     //Led On
        }
        else
        {
            LED = LED_OFF;    //Led off
        }
    }
    return 0;
}
Proteus Simulation:

Recommended Post:
- LED Interfacing with PIC Microcontroller.
- Read and Write to Internal EEPROM of PIC Microcontroller.
- Interfacing EEPROM with PIC Microcontroller – I2C Based.
- Interfacing RTC DS1307 with PIC Microcontroller.
- Display Custom Characters on LCD using PIC Microcontroller.
- Led blinking program in c for 8051.
- Interfacing of switch and led using the 8051
- Interfacing of Relay with 8051 microcontroller
- Moving message display on LCD using 8051
- LCD 4-bit mode c code for 8051.
- Create LCD custom characters for 16×2 alphanumeric LCD
- Interfacing of keypad with 8051
- Electronic digital lock using the 8051
- Interfacing of EEPROM with 8051 microcontrollers using I2C
- Embedded c interview questions.
- 8051 Microcontroller Pin Diagram and Pin Description.
- Can protocol interview questions.
- 8051 Architecture.
