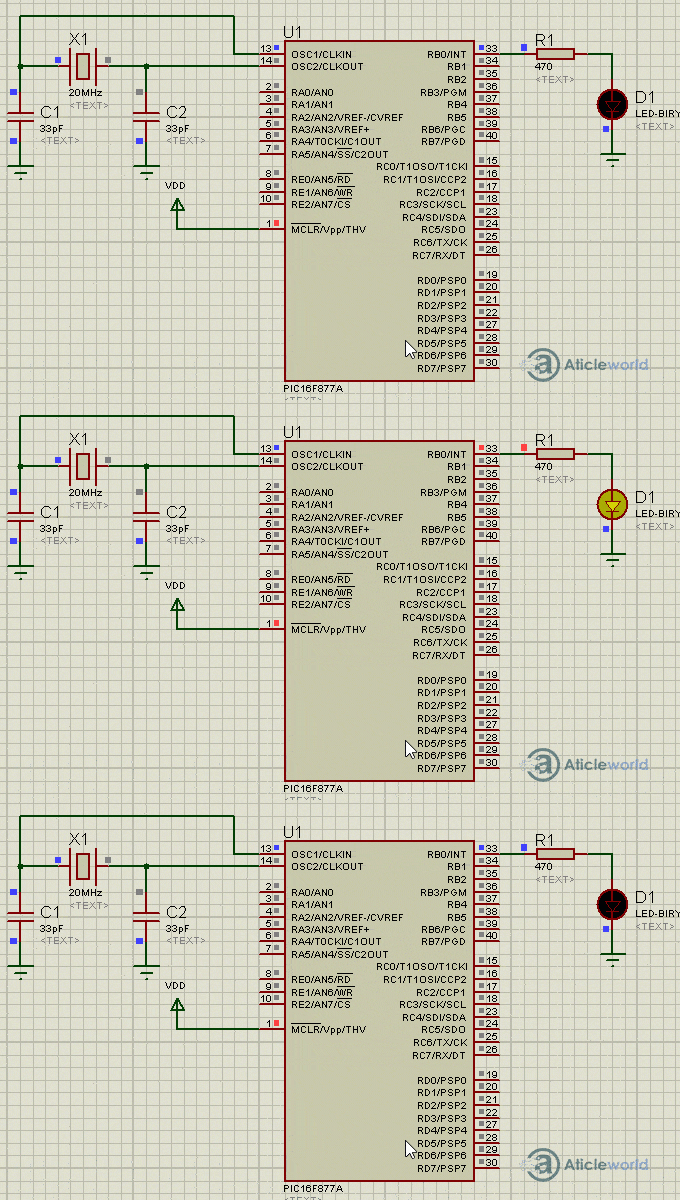
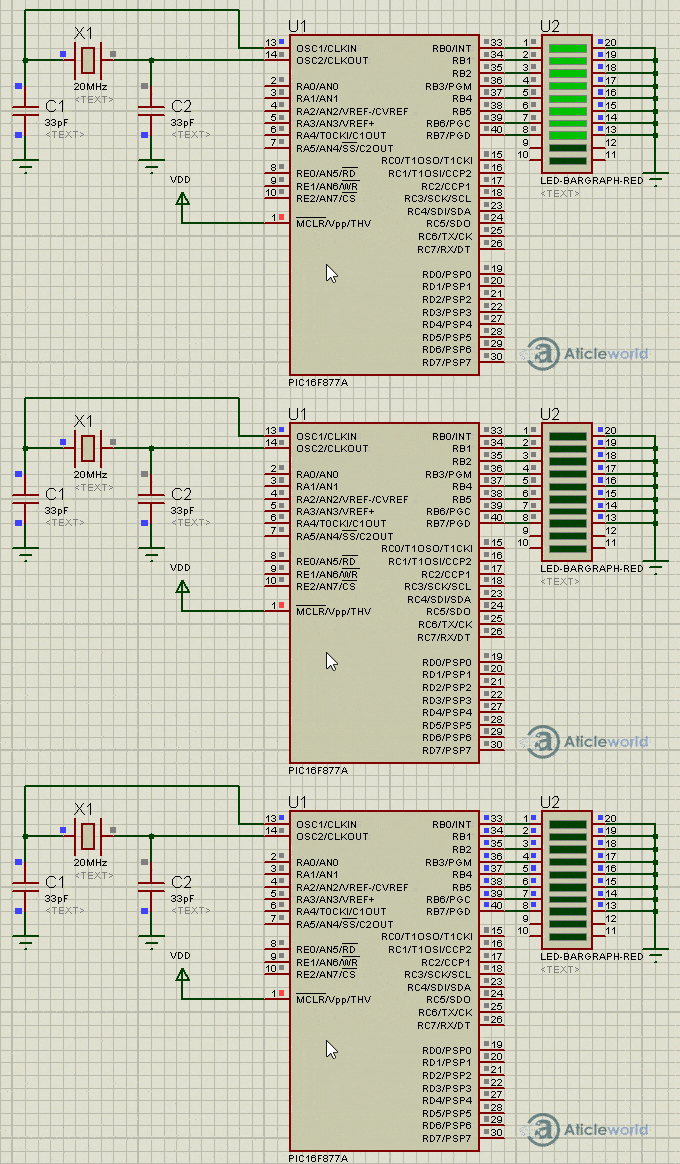
In the article, we will learn led interfacing with PIC Microcontroller. Like another microcontroller PIC also provide the GPIO (General Purpose input-output) pins. We can interface input-output devices to GPIO pins.
The LED interfacing with PIC Microcontroller program is very sample. If you want to toggle the led blinking then you need to toggle the pin. But you must give some delay for LED toggling.
So let us come on the topic and see what is LED and how to interface LED with PIC Microcontrollers. In the last, we will see two programs to toggle the LED.
What is an LED?
A light-emitting diode (LED) is a semiconductor light source that emits light when current flows through it. Electrons in the semiconductor recombine with electron holes, releasing energy in the form of photons. The color of the light (corresponding to the energy of the photons) is determined by the energy required for electrons to cross the bandgap of the semiconductor. White light is obtained by using multiple semiconductors or a layer of light-emitting phosphor on the semiconductor device.
Led have two leads one is the cathode and another one is the anode. We can easily identify the cathode and anode to see the length of leads, the length of cathode leads is lesser than the length of anode but sometimes they come in equal size.
When the length of both leads cathode and anode are equal in the size that time we can identify the anode and cathode to see their filament, the cathode has broader filament than the anode.

Interfacing of Led
It is important to remember that never connect the led directly with Vcc (output voltage which comes from directly 7805 ). It might burn out your LED.
So always connect the led using the resistor. If you want good brightness on LED then you need to select the resistor between 100 to 150-ohm.

Toggle Single LED using PIC Microcontroller:
/*  Name     : main.c
 *  Purpose  : Main file for blinking an LED with PIC16F877A.
 *  Author   : Amlendra Kumar
 *  Website  : https://aticleworld.com
 */

#include<htc.h>

// Configuration word for PIC16F877A
__CONFIG( FOSC_HS & WDTE_OFF & PWRTE_ON & CP_OFF & BOREN_ON
         & LVP_OFF & CPD_OFF & WRT_OFF & DEBUG_OFF);

// Define CPU Frequency
// This must be defined, if __delay_ms() or
// __delay_us() functions are used in the code
#define _XTAL_FREQ   20000000

//define pis for led
#define LED  RB0

//LED STATUS
#define LED_ON           1
#define LED_OFF          0


int main(void)
{
    TRISB0 = 0;	// Make RB0 pin output
    LED    = LED_OFF; // Make RB0 low

    while(1)
    {
        __delay_ms(500);// Half sec delay
        LED = LED_ON;  // LED on
        __delay_ms(500);// Half sec delay
        LED = LED_OFF;// LED off
    }
    return 0;
}
Proteus Simulation:

Toggle LED Bargraph using PIC Microcontroller:
/*  Name     : main.c
*  Purpose  : Main file for blinking an LED with PIC16F877A.
*  Author   : Amlendra Kumar
*  Website  : https://aticleworld.com
*/

#include<htc.h>

// Configuration word for PIC16F877A
__CONFIG( FOSC_HS & WDTE_OFF & PWRTE_ON & CP_OFF & BOREN_ON
          & LVP_OFF & CPD_OFF & WRT_OFF & DEBUG_OFF);


// Define LED pin
#define LED  PORTB

//LED STATUS
#define IN_BINARY(b7,b6,b5,b4,b3,b2,b1,b0) ((b7 << 7)|(b6 << 6)|(b5 << 5)|(b4 << 4)|(b3 << 3)|(b2 << 2)|(b1 << 1)|b0)


// Define CPU Frequency
// This must be defined, if __delay_ms() or
// __delay_us() functions are used in the code
#define _XTAL_FREQ   20000000


int main(void)
{
    TRISB = 0x00;	// Make PORTB pin output
    LED    = IN_BINARY(0,0,0,0,0,0,0,0);// Make PORTB LOW

    while(1)
    {
        __delay_ms(500);       // Half sec delay
        LED = IN_BINARY(1,1,1,1,1,1,1,1); // LED on
        __delay_ms(500);       // Half sec delay
        LED = IN_BINARY(0,0,0,0,0,0,0,0);// LED off
    }

    return 0;
}
Proteus Simulation:

Recommended Post:
- Read and Write to Internal EEPROM of PIC Microcontroller.
- Interfacing EEPROM with PIC Microcontroller – I2C Based.
- Interfacing RTC DS1307 with PIC Microcontroller.
- Display Custom Characters on LCD using PIC Microcontroller.
- Led blinking program in c for 8051.
- Interfacing of switch and led using the 8051
- Interfacing of Relay with 8051 microcontroller
- Moving message display on LCD using 8051
- LCD 4-bit mode c code for 8051.
- Create LCD custom characters for 16×2 alphanumeric LCD
- Interfacing of keypad with 8051
- Electronic digital lock using the 8051
- Interfacing of EEPROM with 8051 microcontrollers using I2C
- Embedded c interview questions.
- 8051 Microcontroller Pin Diagram and Pin Description.
- Can protocol interview questions.
- 8051 Architecture.
