
The LED blinking program is the “Hello World” of any Microcontroller.
If you are just starting with the 8051 microcontrollers, this is the best first project to understand how GPIO pins work, how to configure them as output, and how to control hardware using C code.
In this tutorial, we will cover how to interface an LED with the 8051, explain how its ports behave on startup, and walk through multiple methods to write the LED blink program in C using Keil or any 8051 IDE.
Understanding 8051 I/O Ports
When the 8051 microcontroller is powered ON, all it’s I/O pins are set to logic HIGH (1) by default. This means that, initially, each port behaves as an input until you configure it as an output.
Once configured, writing:
- 1 to the pin drives it HIGH (logic 1)
- 0 to the pin drives it LOW (logic 0)
Example: Controlling an LED on P2.1
Suppose we connect an LED to Pin 1 of PORT 2 (P2.1):
| Output Written | Pin State | LED Status |
|---|---|---|
1 |
HIGH | LED ON |
0 |
LOW | LED OFF |
But there is one important exception for PORT0.Unlike the other ports (Port 1, Port 2, and Port 3), PORT 0 doesn’t have internal pull-up resistors, so it requires external pull-up resistors to function correctly as an output port.
Because of the missing internal pull-ups, Port 0 cannot output a proper logic HIGH (1) on its own. To make it work correctly as an output port, you must connect external pull-up resistors (typically 10kΩ) on each pin you use. Without these resistors, the output pins of Port 0 will float and give unpredictable results.
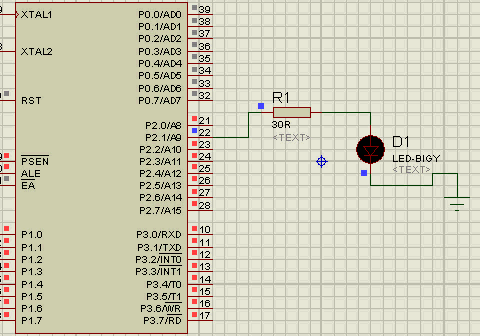
Circuit Diagram – Interfacing a Single LED with 8051 Microcontroller:
This simple circuit demonstrates how to interface a single LED with the 8051 microcontroller (AT89C51) using Port 2, Pin 1 (P2.1). It is one of the most common beginner experiments to understand how to control hardware using GPIO pins.
On important point, unlike Port 0, Port 2 already has internal pull-up resistors, which means you don’t need any external pull-up resistors for it to function correctly as an output port.
Components Required:
- AT89C51 (8051 Microcontroller)
- 1 LEDs
- 1 Resistors – 1KΩ
- Crystal oscillator – 11.0592MHz
- 2 Capacitors – 33pF
- 2 Resistors – 10KΩ
- 1 Capacitor – 10μF
- 8051 Programmer
- 5V Power Supply

Circuit Description:
In this project, the AT89C51 microcontroller controls a single LED connected to Pin 1 of Port 2 (P2.1).
- The positive leg (anode) of the LED is connected to P2.1 through a 1 kΩ resistor.
- The negative leg (cathode) of the LED is connected to ground (GND).
This means:
- When P2.1 is HIGH (1), the LED turns ON.
- When P2.1 is LOW (0), the LED turns OFF.
To provide the clock signal for the microcontroller, an 12-MHz crystal oscillator is connected between pins 18 and 19. Two 22 pF capacitors are connected from these pins to ground to keep the oscillator stable. A 10 µF capacitor and a 10 kΩ resistor form the reset circuit, which ensures the microcontroller starts properly each time it is powered on.
🔌 Connection Summary:
| Connection | Description |
|---|---|
| P2.1 → 1 kΩ Resistor → LED → GND | LED control connection |
| Pins 18 & 19 | Connected to 11.0592 MHz crystal with two 33 pF capacitors |
| Pin 9 (RESET) | Connected to 10 kΩ resistor and 10 µF capacitor for reset |
| VCC & GND | Connected to +5V and ground respectively |
Steps to Write an LED Blinking Program for 8051
Follow these easy, step-by-step instructions to create your first LED blinking program using the 8051 microcontrollers. Each step is explained clearly so even beginners can understand how the LED turns ON and OFF.
Step 1: Select the Port and Pin
Choose the port pin where your LED will be connected. The 8051 microcontroller has four ports — Port 0, Port 1, Port 2, and Port 3 — each having 8 pins.
👉 Example: Connect the LED to P2.1 (Pin 1 of Port 2).
Step 2: Configure the Pin as Output
When the 8051 is powered on, all port pins are configured as inputs by default because they are set to logic HIGH. To use a pin as an output, you must first write ‘0’ to it. This prepares the pin to drive external devices like LEDs.
Step 3: Toggle the Pin State
Now, repeatedly change the logic level of the selected pin:
- Write ‘1’ to make the LED turn ON
- Write ‘0’ to make the LED turn OFF
By toggling between these two states in a loop, the LED will appear to blink.
Step 4: Add a Delay
The microcontroller switches the pin state very quickly. It is too fast for the human eye to notice. So, add a software delay between the ON and OFF states to make the blinking visible. This can be done using a simple for-loop delay function in your C code.
Different Methods to Toggle an LED using 8051 Microcontroller:
In the previous section, we learned the basic steps to interface an LED with the 8051 microcontroller and understand how it can be controlled through an I/O pin. Now, let’s explore a few different ways to write an LED blinking (toggle) program in C for the AT89C51 microcontroller.
In this section, I will explain some simple and effective methods that beginners can easily understand and try on their development boards. Each method performs the same function, turning the LED ON and OFF repeatedly but uses a slightly different logic or coding approach.
By learning these methods, you will not only understand how to blink an LED using 8051, but also gain a deeper understanding of how the AT89C51 handles input/output ports, delay generation, and bit-level operations in embedded C programming.
Method 1 – Using sbit Keyword
The simplest way to control a single pin is by using the sbit keyword. It lets you access a single bit (pin) of a port directly.
Syntax:
sbit Any_Name = Px^y;
- x → Port number (0–3)
- y → Pin number (0–7)
Example code,
#include <reg51.h>

sbit LED = P2^1;    // LED connected to P2.1

void delay(unsigned int count)
{
    unsigned int i, j;
    for(i = 0; i < count; i++)
    {
        for(j = 0; j < 65535; j++)
        {
        }
    }
}


void main(void)
{
    LED = 0;   // Configure as output
    while(1)
    {
        LED = 1;   // LED ON
        delay(2);

        LED = 0;   // LED OFF
        delay(2);
    }
}
Explanation:
- The sbit keyword simplifies single pin access.
- The delay() function creates a software delay loop.
- while(1) ensures continuous blinking.
Method 2 – Using Macros and Binary Representation
In this approach, we use macros to directly control individual bits of a microcontroller port using binary values. This technique is efficient and readable, especially when you need to turn ON or OFF multiple LEDs connected to the same port simultaneously.
By defining macros with binary representation, you can easily visualize which LEDs are ON (1) or OFF (0). This approach making your code more intuitive for debugging and understanding hardware behavior.
#include <reg51.h>

#define LED P2   // Port 2 connected to LEDs

// Macro to convert bit values into an 8-bit binary number
#define IN_BINARY(b7,b6,b5,b4,b3,b2,b1,b0)  \
    ((b7 << 7)|(b6 << 6)|(b5 << 5)|(b4 << 4)|(b3 << 3)|(b2 << 2)|(b1 << 1)|(b0))

void Delay(unsigned int count)
{
    unsigned int i, j;
    for(i = 0; i < count; i++)
    {

        // Reduced inner loop for practical delay
        for(j = 0; j < 50000; j++);
        {

        }
    }
}

void main(void)
{
    while(1)
    {
        // Turn ON LED at P2.1 (others OFF)
        LED = IN_BINARY(1,1,1,1,1,1,0,1);
        Delay(2);

        // Turn OFF all LEDs
        LED = IN_BINARY(1,1,1,1,1,1,1,1);
        Delay(2);
    }
}
Method 3 – Using Bitwise Operators (Advanced & Efficient):
This is a professional and compact approach used in production code. Here we will define macros to set and clear specific bits in the port.
Code Example:
#include <reg51.h>

#define LED P2
#define SET_LED(x)    (1 << x)
#define CLEAR_LED(x)  (~(1 << x))

void delay(unsigned int count)
{
    unsigned int i, j;
    for(i = 0; i < count; i++)
    {
        for(j = 0; j < 65535; j++);
        {

        }
    }
}

void main(void)
{
    LED = 0x00; // Configure as output
    while(1)
    {
        // Set P2.1 HIGH (LED ON)
        LED |= SET_LED(1);
        delay(2);

        // Clear P2.1 LOW (LED OFF)
        LED &= CLEAR_LED(1);
        delay(2);
    }
}
Pro Tips from an 8051 Expert:
- Always connect a resistor (typically 220Ω–470Ω) in series with the LED to limit current.
- PORT0 requires external pull-up resistors if used for output.
- Use hardware timers for more accurate delays instead of software loops.
- You can simulate this program in Proteus or run it on a real AT89C51/AT89S52 board.
Recommended Post:
- Interfacing of switch and led using the 8051
- Interfacing of Relay with 8051 microcontrollers.
- Moving message display on LCD using 8051
- LCD 4-bit mode c code for 8051.
- Create LCD custom characters for 16×2 alphanumeric LCD
- Interfacing of keypad with 8051
- Electronic digital lock using the 8051
- Interfacing of EEPROM with 8051 microcontrollers using I2C
- Embedded c interview questions.
- 8051 Microcontroller Pin Diagram and Pin Description.
- Can protocol interview questions.
- 8051 Architecture.