In the previous post, we learned how to blink an LED using an Arduino. Now, we are taking the next step by building a simple and interactive Arduino project.
In this project, we will control an LED using a push button. It helps you understand how to work with digital inputs (push buttons) and digital outputs (LEDs). In this tutorial, you will learn how Arduino reads button input, processes digital logic, and controls an LED accordingly.
This project builds a strong foundation for Arduino programming, embedded systems basics, and real-world electronics applications. By the end of this article, you will learn:
- How push-button work.
- How to wire a button and LED correctly.
- How to write Arduino code to detect presses.
- How to debounce a button in code.
- Practical tips & common mistakes.
Components Required:
To blink an LED using Arduino, you need the following components:
| Component | Quantity |
|---|---|
| Arduino board (Uno / Nano / Mega) | 1 |
| LED | 1 |
| BUTTON | 1 |
| Resistor (220Ω or 330Ω) | 1 |
| Breadboard | 1 |
| Jumper wires | As required |
| USB cable | 1 |
What is Push Button:
A push button is a simple mechanical switch that controls the flow of electricity in a circuit. It is the most fundamental input device in embedded systems.
When you press a push button, it physically connects or disconnects two points in the circuit, allowing the microcontroller to detect a user action. Although it looks very simple tool, but incorrect handling of push buttons is one of the most common causes of bugs in beginner embedded projects.
At its core, a push button provides a digital input signal, which means it can exist in only two states:
- Pressed (Closed): The metal contacts touch, completing the circuit.
- Released (Open): The spring pushes the contacts apart, breaking the circuit.
To a microcontroller, these physical push button actions are translated into voltage levels, Logic HIGH or Logic LOW, which your firmware then interprets as a command. Depending on how the button is wired, these states are read by the Arduino as either logic HIGH (1) or logic LOW (0).
Button Logic: Active High vs Active Low:
Push buttons are typically wired in one of two ways:
| Configuration | Wiring | Pressed State | Released State |
|---|---|---|---|
| Active High | Pin → Button → VCC | Logic 1 | Logic 0 (Pull-down) |
| Active Low | Pin → Button → GND | Logic 0 | Logic 1 (Pull-up) |
Button Circuit (Arduino Button Input Basics):
Before writing Arduino code, it is very important to understand how a push button is wired and how its mechanical behavior affects input readings. Push buttons can be connected using pull-up or pull-down configurations. Also, because mechanical switches do not change state cleanly, button debouncing is required for reliable operation.
Let’s understand button wiring and debouncing step by step using Arduino.
How to Connect a Button to Arduino:
There are two commonly used button wiring configurations:
Let’s understand how to connect a button to your Arduino. There are two common configurations:
1. Pull-Up Configuration (Most Common in Arduino)
In this configuration, the GPIO pin is pulled to a high voltage (Vcc, usually 3.3V) when the button is open (not pressed).

Wiring:
- One side of the button → GND
- Other side → Arduino digital pin
Behavior:
- When the button is not pressed, the input pin reads HIGH (1) because it is held at a high voltage level by the internal pull-up resistor.
- When the button is pressed, the pin is connected to ground and reads LOW (0)
This configuration results in active-low logic, meaning the button press is detected when the pin reads LOW.
Arduino Configuration:
pinMode(BUTTON_PIN, INPUT_PULLUP);
What this means in practice
-
- Pin reads HIGH when the button is not pressed.
- Pin reads LOW when the button is pressed (connected to GND).
- No external resistor is required for most button applications.
Timing Diagram: Button Press with Pull-Up Resistor
The diagram below shows what really happens when a button is pressed.
- The signal starts HIGH (button released)
- During the press, the signal bounces rapidly
- After a few milliseconds, it settles LOW (button pressed and stable)
State:    RELEASED                               PRESSED (Stable)
          (Default HIGH)                         (Active LOW)
               │                                     │
               ▼                                     ▼
Voltage
  HIGH  ───────┐        ┌──┐  ┌──┐
    │          │        │  │  │  │
    │          │        │  │  │  │
    │          │        │  │  │  │
    │          └────────┘  └──┘  └───────────────────
  LOW        (Button connects to GND)

Time ─────────────>   [  Bounce Period (~5 ms)  ]
2. Pull-Down Configuration
In the pull-down configuration, the GPIO pin is pulled to a low voltage (Ground) when the button is open (not pressed).

Wiring:
- One side of the push button → Connects with VCC.
- Other side of the push button → Connects with Arduino digital input pin.
- External pull-down resistor → Connects the Arduino digital pin to GND
Behavior:
- When the button is not pressed, the pin reads LOW (0). The pull-down resistor forces the input pin to LOW, preventing floating inputs.
- When the button is pressed, the pin is connected to VCC and reads HIGH (1). The pin is directly connected to VCC, so it reads HIGH.
Timing Diagram: Button Press with Pull-Down Resistor
The diagram below shows the real signal behavior when using a pull-down configuration.
- The signal starts LOW (button released)
- During the press, the signal bounces rapidly
- After a few milliseconds, it settles HIGH (button pressed and stable)
State:    RELEASED                               PRESSED (Stable)
          (Default LOW)                          (Active HIGH)
               │                                     │
               ▼                                     ▼
Voltage
  HIGH          ┌────────┐  ┌──┐  ┌──┐  ┌───────────
    │           │        │  │  │  │  │  │
    │           │        │  │  │  │  │  │
    │           │        │  │  │  │  │  │
    │───────────┘        └──┘  └──┘  └──┘
  LOW      (Pull-down holds pin at GND)

Time ─────────────>   [  Bounce Period (~5 ms)  ]
Button Debouncing in Arduino:
When a mechanical push button is pressed or released, the physical metal contacts do not settle immediately. Instead, they bounce for a few milliseconds, causing the signal to rapidly fluctuate between HIGH and LOW before settling into its final, stable state. This unwanted fluctuation is known as contact bounce or jitter.
Because of this jitter, the microcontroller may interpret a single button press as multiple presses, leading to unexpected or incorrect behavior in the program. Therefore, these rapid fluctuations must be ignored or filtered out.
But before discussing how to eliminate this jitter (debouncing), let’s first understand the actual problem it creates in a real circuit.
Why bouncing is a Problem?
Arduino input pins sample the signal extremely fast, much faster than the mechanical settling time of a push button. As a result, instead of detecting a single press, the microcontroller may register multiple rapid transitions caused by contact bounce.
Because of this, one physical button press can be mistakenly interpreted as:
- 3 presses
- 5 presses
- 10 presses
- Or even more in extreme cases
This is why button debouncing is essential to ensure that one physical press is counted as exactly one logical press.
Real-world issue:
Push Button bouncing is not just a theoretical problem, it causes real, noticeable, and sometimes dangerous issues in practical systems:
1. Page Skipping (Phantom Press): I encountered this issue in a smart meter that uses a mechanical push button. The intended functionality was simple: a short button press should move the display to the next page. However, due to the mechanical nature of the switch, the system would sometimes register three rapid pulses for a single physical press. As a result, instead of navigating to the next screen, the interface skipped multiple pages, forcing the user to cycle through the entire menu again to find their intended option.
This behavior is illustrated conceptually as:
Signal
HIGH ────────────┐     ┌─┐ ┌─┐ ┌─┐
                 └─────┘ └─┘ └─┘ └──── LOW
Time ────────────────────────────────────▶
Each small pulse during the bounce period can be falsely detected as a valid button press.
2. Unpredictable Control (Toggle Glitch): You press a button to toggle an LED or motor. Instead of turning ON, the device rapidly cycles ON-OFF-ON-OFF in milliseconds. The system ends up in a random state (sometimes OFF, sometimes ON) or causes flickering that stresses the power supply.
3. Data Corruption (The Counting Error): You press a button to increment a counter by 1. Because the Arduino detects multiple signal spikes (spurious transitions) during the bounce period, it interprets them as valid inputs. The counter increments by 5, 10, or more, completely corrupting the data.
Now I believe, you should understand how serious the button bouncing problem really is. It is not just a minor inconvenience, but it can become a major safety hazard if not handled properly.
A very famous real-world example of this issue occurred in medical infusion pumps. In this case, the root cause was a mechanical defect in the keypad, which led to a phenomenon known as key bounce.
A widely used infusion pump series was found to have a keypad design flaw where a single key press could be detected as multiple presses. Due to this key bounce, the controller sometimes misinterpreted user input. For example, when a nurse intended to enter 4, the system could register it as 44 during dosage programming.
Such incorrect input could result in infusion rates far higher than intended, posing a serious risk to patient safety. This incident clearly demonstrates that button bounce is not just a software or hardware annoyance, it is a critical issue that must be addressed in all professional and safety-critical embedded systems.
Ways to Handle Button Debouncing:
We can handle switch bouncing by two ways:
- Software debouncing
- Hardware debouncing
Software Debouncing:
Software debouncing is done inside the Arduino code.
Software debouncing is handled inside the Arduino code. There are two main approaches to filters out the unwanted transitions.
1. Blocking (Delay-Based) Debouncing
This is the simplest and most commonly used debouncing technique, especially in small projects and by beginners.
In this method, when a push button press is detected, the firmware waits for a short, fixed delay (typically 10–50 ms) to allow the mechanical bouncing to settle. After the delay, the button state is read again. If the state is still the same, the button press is treated as valid.
Working Steps:
- Detect a button state change.
- Insert a short delay (debounce time).
- Read the button again.
- If the state is unchanged, confirm the button press.
Pros:
- Very easy to understand and implement
- No additional hardware required
Cons:
- Uses blocking delays
- Not suitable for real-time, interrupt-driven, or multitasking systems
- CPU remains idle during the delay, reducing system responsiveness
Example code,
void checkButton()
{
   // 1. Detect a button state change (e.g., Pressed)
   if (digitalRead(BUTTON_PIN) == LOW)
   {

      // 2. Insert a short delay (The CPU "sleeps" here)
      delay(50);

      // 3. Read the button again
      if (digitalRead(BUTTON_PIN) == LOW)
      {
         // 4. If state is unchanged, confirm the press
         toggleLED();
      }
   }
}
Timer-Based Debouncing (Non-Blocking):
Timer-based debouncing is the recommended and preferred approach in embedded systems software. Unlike simple delay()-based methods that block the CPU and reduce system responsiveness, this method uses a periodic time reference to process button inputs in the background.
Common time sources include:
- Hardware timers.
- SysTick.
- RTOS timers or periodic tasks.
Key Idea: A state change is considered valid only after the signal has remained stable for a specified duration.
How Timer-Based Debouncing Works:
Instead of continuously reading the button inside the main loop, the firmware creates a fixed periodic callback, typically every 1 ms or 5 ms. This callback drives the entire debouncing process.
Typical flow would be:
- A timer is configured for a fixed period (e.g., 1 ms or 5 ms).
- When the timer expires, the MCU executes a callback function.
- Inside that callback:
- Sample the button GPIO
- Update the debounce state machine or counter
- The main loop remains clean and non-blocking
Example Code:
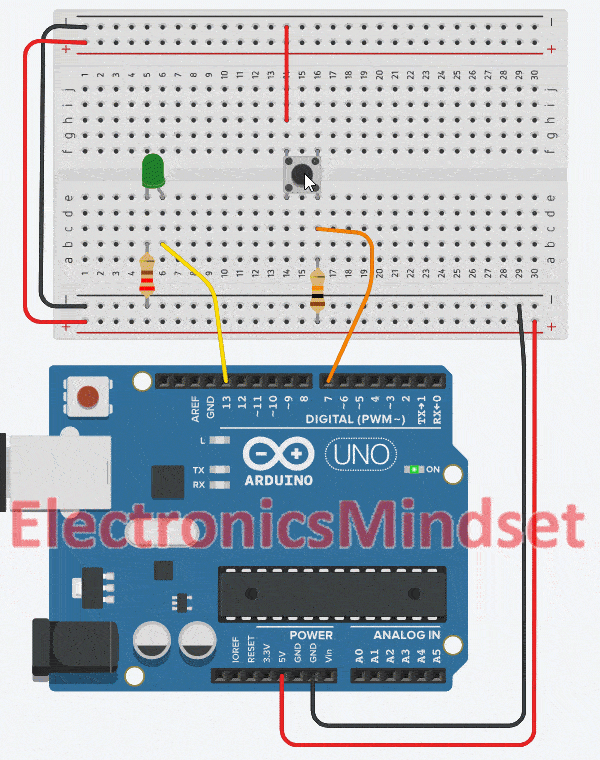
This Arduino program reads a push button connected to pin 7, debounces it in software to avoid false triggers from mechanical bouncing and toggles an LED on pin 13 each time the button is pressed. The debounce uses a non-blocking, millis()-based approach.
#define BUTTON_PIN 7
#define LED_PIN 13
#define DEBOUNCE_MS 50

// Tracks the LED status
uint8_t ledState = LOW;

/*Returns true ONLY once when
the button is successfully pressed*/
bool isButtonPressed() {
  /*
  Static variables persist between function calls
  Because these are static,
  this function works for ONLY ONE button.
  */
  static uint8_t lastRawState = HIGH;
  static uint8_t stableState = LOW;
  static unsigned long lastChangeTime = 0;

  // 1. Read the pin
  uint8_t rawState = digitalRead(BUTTON_PIN);
  unsigned long now = millis();

  /*2. If the raw reading changed
  (due to noise or press), reset the timer*/
  if (rawState != lastRawState) {
    lastRawState = rawState;
    lastChangeTime = now;
  }

  /* 3. If enough time has passed
  without the raw reading changing...*/
  if ((now - lastChangeTime) >= DEBOUNCE_MS) {
    /*
        ...and if this stable state is
        different from what we thought it was
        */
    if (rawState != stableState) {
      stableState = rawState;

      /* 4. If the new stable state is LOW,
          it means a PRESS occurred*/
      if (stableState == LOW) {
        return true;
      }
    }
  }

  return false;
}

void setup() {
  /*
  Use internal pull-up resistor
  (Button connects Pin -> GND)
  */
  pinMode(BUTTON_PIN, INPUT_PULLUP);
  pinMode(LED_PIN, OUTPUT);

  // Set initial LED state
  digitalWrite(LED_PIN, ledState);
}

void loop() {
  /*
  This check is non-blocking.
    The loop keeps running fast.
        */
  if (isButtonPressed()) {
    // Toggle LED state
    ledState = !ledState;
    digitalWrite(LED_PIN, ledState);
  }
}
Hardware Debouncing (Using an RC Filter)
Hardware debouncing ensures that the microcontroller receives a clean, stable signal by filtering out the rapid voltage changes caused by switch bounce. One of the simplest and most effective hardware techniques uses an RC (Resistor–Capacitor) Low-Pass Filter.
How the RC Filter Works:
An RC filter smooths out fast electrical transitions. When the switch bounces, the voltage rapidly toggles between HIGH and LOW.
The capacitor charges and discharges slowly, preventing these rapid fluctuations from reaching the microcontroller’s input pin.

This means:
The bouncing still occurs physically, But the MCU sees only one clean transition, because the RC filter removes the high-frequency noise.
Uploading the Program:
Once your code is ready, follow these steps to upload it to the ATmega2560 (Arduino Mega 2560):
Connect the Board:
Plug your Arduino Mega 2560 into your computer using a USB cable.
Open the Arduino IDE:
Launch the Arduino IDE on your PC or laptop.
Select the Board:
Go to Tools → Board → Arduino AVR Boards and select Arduino Mega or Mega 2560.

Select the Port:
Go to Tools → Port and choose the port that appears after connecting the board (for example, COM4 on Windows or /dev/tty… on macOS/Linux).
Upload the Code:
Click the Upload button (right-arrow icon) or press Ctrl + U.

After the upload is complete, the built-in LED will start blinking according to your program.
Frequently Asked Questions (FAQs)
Q1). Why does my Arduino detect multiple button presses for a single press?
This happens due to mechanical bouncing. When you press a button, the internal metal contacts bounce for a few milliseconds, causing the signal to rapidly change between HIGH and LOW. Arduino reads inputs very fast, so it may detect multiple presses unless debouncing is used.
Q2). What is the easiest way to debounce a button in Arduino?
The easiest method is delay-based debouncing using delay(). However, this approach blocks the CPU and is not recommended for real projects. A millis()-based (non-blocking) debounce method is the preferred and professional solution.
Q3). Why does my button read LOW when I press it?
This is normal when using internal pull-up resistors.
- Not pressed → HIGH
- Pressed → LOW
This is called active-LOW logic and is very common in embedded systems.
Q4). Can I debounce a button without using delay()?
Yes. You should use a non-blocking debounce method based on millis(). This allows Arduino to continue running other tasks while debouncing the button.
Q5). Can I use interrupts for button handling?
Yes, but it is not recommended for beginners.
Interrupt-based buttons still need debouncing and can cause false triggers if not handled carefully. Polling with non-blocking debounce is simpler and more reliable for most applications.
Q6). Can this debounce logic work with multiple buttons?
Yes.
You can:
- Use separate functions for each button, or
- Use a struct-based approach for scalable designs
Both methods are commonly used in professional firmware.
Q7). Does debouncing apply only to push buttons?
No.
Debouncing applies to:
- Toggle switches
- Rotary encoders
- Mechanical relays
Any mechanical contact can bounce.
Q8). Is debouncing still required with high-quality buttons?
Yes. Even high-quality mechanical switches bounce, although for a shorter duration. Debouncing ensures consistent and predictable behavior.
Q9). Why is active-LOW logic standard in embedded systems?
There are three main reasons:
- Hardware Efficiency: Microcontrollers have internal pull-up resistors, eliminating the need for external components.
- Safety: If a button wire accidentally touches the metal chassis (ground), it registers as a harmless “press.” If a 5V wire touches ground, it creates a dead short that can damage the board.
- Noise Immunity: Ground is the most stable reference point in a circuit, making it less susceptible to electrical noise than power rails.
This is why professional firmware almost always expects a button to read 0 (LOW) when pressed.
You May Also Like
- Blink Multiple LEDs at Different Speeds Using Arduino.
- Arduino Blink LED Tutorial – Circuit and Code Example.
- Does the Current Change After a Resistor?
- What is use of current Limiting Resistor?
- How to Interface an LED with an 8051 Microcontroller.
- Map-Based Method for GPIO Alternate Function Configuration.
- How to Interface an LED with an STM32H5.
- Interfacing of switch and led using the 8051.
- STM32 GPIO Guide: How to Control LEDs and Button.